Wednesday, June 8, 2011

Not just another tart


I didn't realize until the start of this post that I have been putting up tart recipes for the last few entries. Weird, lol. This will be another one, but before you dismiss it, hear me out. This is one recipe you do not want to miss. Plus, it isn't entirely a tart. You'll see what I mean.


One of the benefits of living in the Marais is easy access to great food. For french fare, there is Le dome du Marais or the modern-furnished Glou. For steaks, Robert & Louise serves them well-seasoned (with sea salt!) cooked over a flaming grill. If you're looking for more exotic flavors, Nanashi has an interesting reinvented gyudon (traditionally cooked beef over rice; Nanashi transformed it into a salad with lots of Arugula leaves and a light refreshing Japanese dressing) and L'as du Falafel has the best falafels worth queuing up to 20 minutes for. For something on the lighter side, there are several Jewish bakeries selling bagels, a few boulangeries with the standard baguette sandwiches, Candelaria for tacos or Tartes Kluger. True to its name, this cafe serves only tarts, both salty and sweet.


The tart which left an impression on me was their Chocolate Tart. It was the first time I had a moist brownie-like cake inside a tart shell. Although the chocolate was a tad bit too sweet I found the concept fascinating. What started as meaning to just have one bite ended up being the whole slice.  


Thus began my search for the chocolate filing to recreate the dessert at home. I wanted to keep the moist consistency but lessen the sweetness. The filling is definitely softer than an american style brownie and I'm pretty sure doesn't contain condensed milk like one recipe suggested. Being french-style, it's most likely a fondant cake and my favorite baker has one online recipe on it.


Her recipes in the past hadn't failed me. Neither did this one. It was beyond what I expected and if I may say, I preferred this filing to the original's. Not too sweet, very moist, kind of crumbly and really chocolatey. The recipe stands on its own without the tart base, so like I mentioned in the beginning, it's actually a brownie recipe. The best I've found thus far.


Strangely enough, I couldn't find the paddle attachment of my electric beater this morning. The recipe calls for the eggs and sugar to be beaten for 2 minutes with the electric beater. But seeing how they make genoise in the pastry kitchen of my internship got me thinking of an idea. The recipe below has been modified to be entirely hand-made :D


French Brownie Tart
adapted from here
makes a 20cm tart


Ingredients
220g sweet shortcrust pastry (pate sucree)
85g bittersweet chocolate (70% Lindt)
50g unsalted butter, cut into pieces
35g salted butter (or 85g unsalted butter and a pinch of salt)
2 eggs
1/2 cup caster sugar
1/4 cup all-purpose flour
a pinch of cinnamon
chocolate chips, for garnish (optional)


Method

  1. Preheat oven to 180C.
  2. Line a tart ring/mold and blind-bake the shell for 15-20 minutes or until light golden brown
  3. Meanwhile, melt the chocolate in a bowl over a bain mairie (a saucepan of simmering water).
  4. Take off the bowl, add the butter into the chocolate and mix until the butter is fully melted. If there are pieces that are not melting, put it over the water again. Ensure that the mixture doesn't get too hot. Set aside.
  5. In a medium bowl, crack the two eggs and whisk until the yolks and whites are mixed well (important to ensure the sugar is incorporated properly in the next step).
  6. Add half of the sugar and whisk immediately.
  7. Set the bowl over a bain mairie, whisking all the while, until the egg mixture is hot to the touch (when the eggs are tempered).
  8. Once the eggs are tempered, take the bowl out of the bain mairie, add the rest of the sugar and continue whisking until the mixture is thick and pale (almost white).
  9. Pour in the melted chocolate-butter mixture and mix only until it is incorporated.
  10. Fold in the flour and cinnamon powder.
  11. Scrape the batter into the tart shell, top with the chocolate chips if using, and bake for 25-30 minutes, or until a knife inserted to the center comes out clean.
  12. Leave the tart to cool in the mold/ring for several minutes before unmolding and transferring it to a rack to cool to room temperature.
  13. Slice and serve :)

Sunday, March 20, 2011

How to eat a croissant

People might think that since I live in Paris, I would be and should be eating croissants everyday. Wrong. I prefer the escargot (a rolled danish pastry usually with raisins) or the pain aux noix (walnut bread). I was reading David Lebovitz's blog the other day and if the sesame or cereal baguette was crack to him, these two breads are for me.

But on the occasion that I do eat croissants, I like to dress them up. 
Melted Comte, slice of prosciutto, poached egg, salt & pepper.


Honestly, this is one awesome combination. The layers of croissant pastry would soak up the runny egg yolk and the saltiness of the prosciutto and cheese flavors it. It also comes in pretty handy when you have guests or friends over in the morning. Parisians don't eat a lot for breakfast so it's difficult to find fried eggs and bacon around town at a reasonable price. This, you can whip up easily at home, at a friendly budget and impress your friends in the process. Otherwise, it's a good way to treat yourself and savour the beauty of a croissant.


How to Poach an Egg

  1. You'll need a frying pan that is quite deep. Fill it with enough water to cover an egg (about 2/3) and bring it to a simmering boil. It's when you can see bubbles on the base of the pan and some small ones are escaping to the surface. If the water's gone to a boil, don't worry. Lower the heat to bring it to a simmer. Meanwhile, crack an egg into a small bowl.
  2. When the water has reached a simmer, use a whisk and create a whirlpool.
  3. Quickly but gently (be as close to the surface of the water as possible), slide in the egg.
  4. For runny yolks, leave it to cook for 3 minutes. You can also use a wooden spoon to gently fold the edges of the egg whites over the egg. This makes the egg come out neater. 
  5. Take out using a slotted spoon and serve immediately :)

Wednesday, March 16, 2011

Honey


I didn't expect buying honey in the supermarket would be confusing.


There was honey in liquid form and there was honey that looked like...paste (okay, I must be the most clueless person around to be surprised that it's raw honey). Then there was honey in pale yellow, gold, brown and deep brown. The description didn't help either. Honey with orange, honey from flowers, mountain honey, natural, bio and honey from France, Spain and this other country I didn't know the translation for.

I guess I should be thankful to have a variety of choice. But what's the difference in taste? Honestly, I have not a clue. In the end, I just chose whichever looked the most familiar and 'reliable' to me. One thing I know, though, is that honey is delicious in both savory and sweet dishes. 


Remember cafe Le Loire from my previous post? When I went there, I also tried their emmenthal quiche with honey and pine nuts. It's been resonating in my mind ever since. Who would have thought of mixing cheese and honey? Yum! It's one of the best and most surprising combinations I've come across while in France (The first encounter was a baked camembert cheese drizzled with honey. That was amazing too!)


Honey and desserts are, of course, no strange territory. So is a honey pound cake. I found and adapted the recipe from Joy the Baker. A sweet finish to a sweet start.

Emmenthal Quiche
with honey & pine nuts
makes a 22cm tart 

Traditionally, a quiche egg mixture is fully cream with eggs, but mindful of my waistline, I've decided to sub 1/3 with milk. You can do half and half.

Ingredients
250g shortcrust pastry dough (pâte brisée)
3 eggs
200ml double cream
100ml milk
salt, pepper, nutmeg
1 cup grated emmenthal cheese
honey, for drizzle
pine nuts, toasted, for garnish


Method
  1. Preheat oven to 180C.
  2. Roll out the pâte brisée and line a 22cm tart ring/pan.
  3. Prick with base with a fork and blind bake until light golden brown.
  4. While the shell is baking, whisk the eggs and cream in a medium bowl.
  5. Season to taste.
  6. Add 1/2 of the grated cheese to the mixture.
  7. After the shell is partially cooked, sprinkle 1/2 of the remaining cheese on the base of the tart.
  8. Fill the shell to the brim with the mixture.
  9. Sprinkle the remaining cheese on top.
  10. Bake in the oven for 45 minutes or until the top is golden. (I read in a blog that it's good if the quiche is still jiggly but a knife inserted into 2.5cm from the edge comes out clean. If one tests the center, it would be too dry).
  11. Leave to cool in a wire rack.
  12. To serve, drizzle honey and several pine nuts on the individual slices.

Honey Pound Cake
makes 1 loaf
adapted from here

Ingredients
1 1/4 cup all-purpose flour
1 cup buckwheat flour
2 tsp baking powder
3/4 tsp salt
a pinch of cinnamon, nutmeg and all-spice
190g unsalted butter, room temperature
2/3 cup sugar
1/2 cup honey
3 eggs,
1 cup milk
100g walnuts, chopped finely (optional)

Method
  1. Preheat the oven to 180C.
  2. Butter and flour a loaf pan.
  3. Whisk the flours, baking powder, salt and spices together in a medium bowl. Set aside.
  4. In another medium bowl, beat the butter, sugar and honey until light and fluffy, about 3-4 minutes.
  5. Beat in the eggs one by one, beating well after each addition.
  6. Fold in the dry ingredients in 3 additions and alternate with the milk.
  7. Fold in the chopped walnuts.
  8. Pour the batter into the loaf pan and smoothen the top.
  9. Bake for 1 hour or until a knife inserted into the center comes out clean (I had to bake it for another 10 minutes).
  10. Remove from oven and leave to rest for 30 minutes before unmolding and cooling it on a wire rack.
Whatever you do, don't start slicing the bread until it's cooled. Or if you must do so, do it carefully. Loaf cakes are fragile when still hot and at school the chef actually said quickbreads are better after a week. I'm not sure about a week...but the honey loaf sure tastes better after a day.


Monday, February 14, 2011

Pâte sablée


In French pastry, the short-crust dough can mean a lot of things. 
It can be the pâte à foncer (or brisée), the pâte sucrée or the pâte sablée. 

What's the difference among them all? The point at which the butter is added and the ingredients.

The pâte à foncer is the most basic of them. It's made by cutting the butter into the flour and it does not use any sugar or baking powder. It's the shortcrust dough for savory tarts and some sweet tarts like the classic tarte aux pommes.
The Pâte Sucrée contains icing sugar and is made by creaming the sugar and the butter first before adding them to the dry ingredients. The result is a base that's firmer (less crumbly) than the pâte à foncer. It's used for dessert tarts, from the classic French pear tart, to the lemon or chocolate tart.
photo.php.jpg
Pâte sablée, is a variation of the pâte à foncer. It's made in the same method by cutting butter into the dry ingredients but it has the addition of icing sugar and baking powder. It's the most crumbly of all the doughs and, in fact, it is the dough for shortbread biscuits.

The similarity? The mixing of the dough. The aim of any tart-making process should be to prevent elasticity and developing gluten in the tart. In other words, to handle or knead the dough in the least amount possible. Why? Because gluten will make the tart hard as cardboard and coarse as sandpaper. The tart base should have visible layers of dough. The method they taught us in school is strange but it does the trick. 


Pâte sablée

Ingredients
250g all-purpose flour
5g baking powder
125g icing sugar
125g cold unsalted butter, cut into cubes
1 egg

Method
  1. Sift together the flour, baking powder and icing sugar onto a work surface
  2. Add the butter cubes and using your fingertips, rub them into the flour until no large pieces remain (pea-sized butter pieces are fine).
  3. Scoop up the flour and rub them between your palms, around 6-8 times, until the mixture resemble breadcrumbs.
  4. Make a well in the middle of the mixture and crack the egg in it.
  5. Break the yolk and slowly mix it into the mixture until it forms a dough. Don't knead. If there are dry pieces of flour, take the formed dough in your hand and 'dab' it onto the dry pieces.
  6. Gather the dough into a rectangle, and using a metal scraper, cut a small part of the dough and push it down onto the work surface with the blade. Do this 3-4 times on the same piece of dough. It should look curled in the end.

   7. Do this to the rest of the dough and gather the curls in a cling wrap.

   8. Pat to flatten and refrigerate until needed.

A pie and the foolproof way to make caramel sauce

One other flavor that can rival chocolate in its sweet, velvety and comforting goodness is most probably caramel. In the past, I tended to overlook this ingredient. It was too sweet, too sticky and plain difficult (i.e. scary!) to make. The first time I made caramel, it burnt. The second time, it was way undercooked. After that, I stayed away.

However, the past week had given me a fresh perspective.

I had just completed the second week of pastry internship and the major task was to make caramel. Caramel ice cream, soft caramel candies and caramel ganaches for chocolate bonbons. I had no choice but to face my fear. Thank goodness for my leader. He showed me some tips on how to avoid caramel disasters and most important of all, the color to pour in the cream. Seeing the whole process put caramel in a new light for me. It is tricky, but it is amazing how something as simple as sugar can be transformed to taste, smell, look and feel differently. Not forgetting, the best partner of caramel is the salted butter.


paris-le-loir-dans-la-theiere.jpg
Then there was the cafe. At first glance, Le Loir dans la Théière's maroon walls and dim-lighted interior don't stand out much. Look further, and it's one of those rare places in Paris with armchairs, wall-posters and a not-trying-too-hard ambience that you can sit in all day. They have a long table filled with the desserts of the day. Homey desserts. There is always a tall, bursting lemon meringue pie (their specialty), a crumbly chocolate tart, big slices of almond cake and a towering, long millefeuille. Last monday, they had Banoffee.
The banoffee came in a rectangular slice: the top two thirds was whipped cream, then a layer of banana slices in a brown sauce (coffee came to my mind) and finally a biscuit. The first bite confirmed that the filling were bananas in caramel and the base a crispy, crumble-like tart dough. The caramel was the ingredient that brought all the elements together.

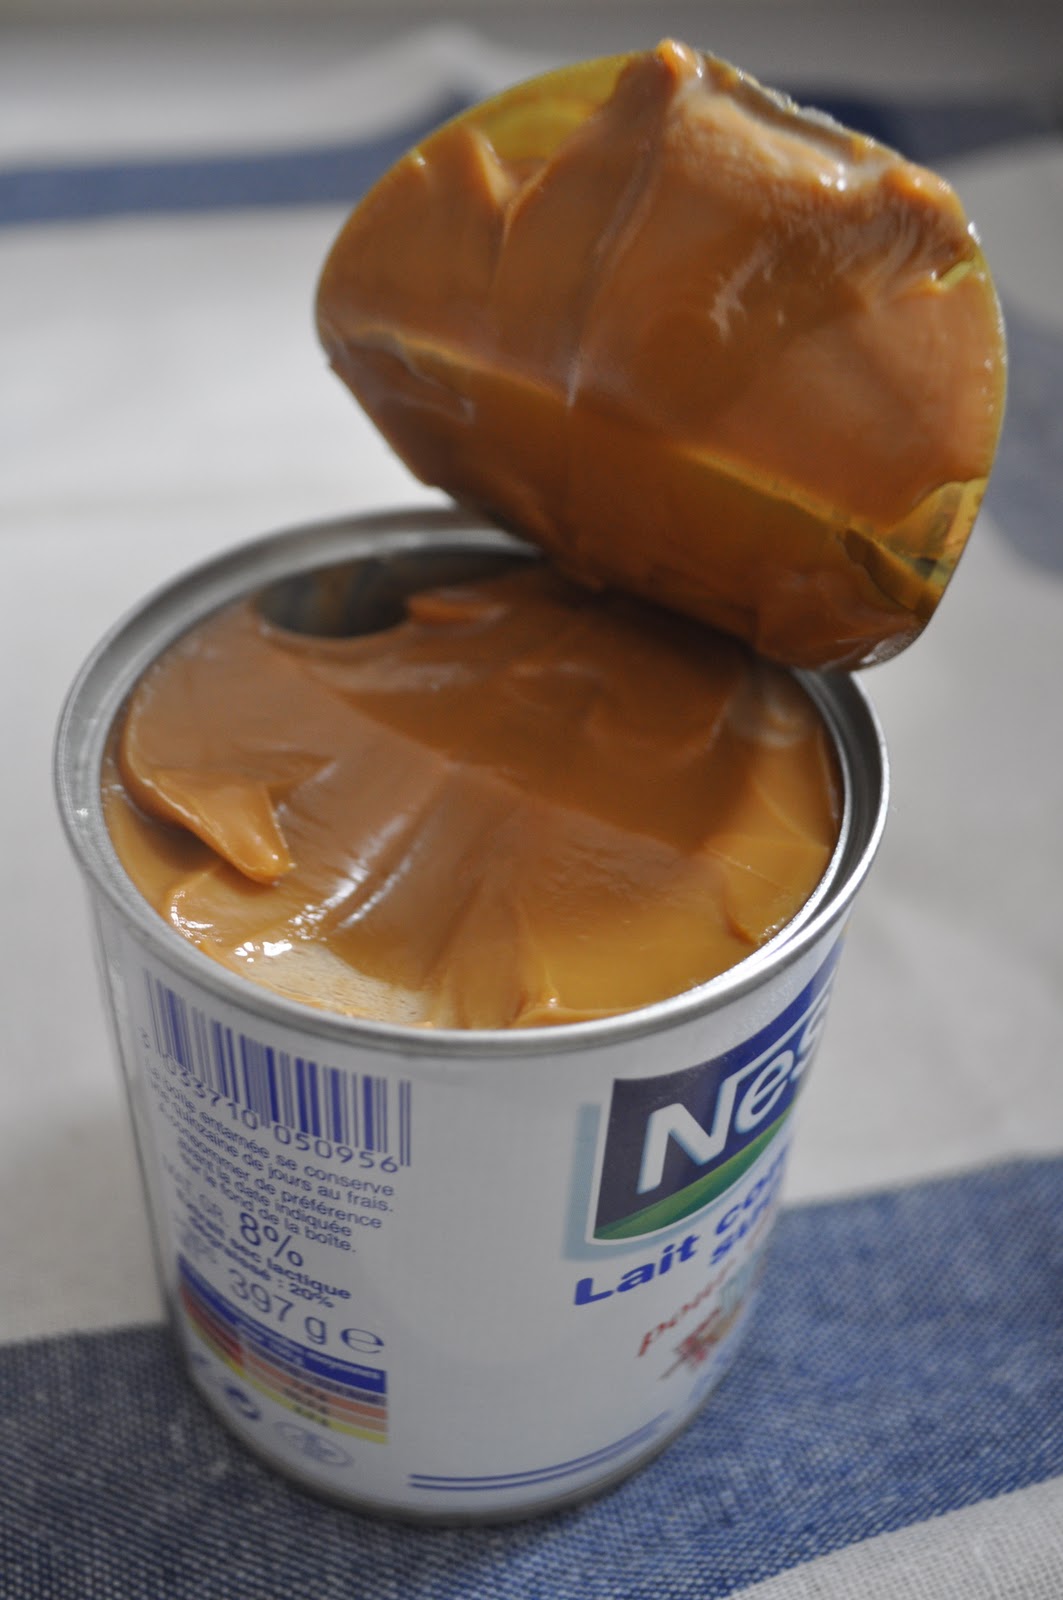
I couldn't stop thinking about the Banoffee after my caramel week. I googled the recipe and strangely enough, the original dessert (from Britain) doesn't even use real caramel! The recipes said to boil an unopened can of condensed milk for 3 hours. I couldn't believe it at first, but now...
Yes, the color did change. The result is not as nutty or fragrant as the real deal but it still tastes great for this pie. Best of all, it's easy to make. Guaranteed. Just make sure that you cover the can fully with water at all times. Otherwise it might explode.


Banoffee
makes a 22cm tart
adapted from here


Ingredients
250g Pate Sablée or any other shortcrust pastry dough
1 can (375g) condensed milk
3 large bananas, sliced
300ml whipping cream
3 tbsp mascarpone cheese
1/2 tsp instant coffee
1 tsp caster sugar
vanilla extract
cocoa powder, for garnish


Method
  1. Immerse the unopened can of condensed milk in water and boil it for 3 hours. Check every 15-20 minutes to ensure there is enough water to fully cover the can. Add more if necessary.
  2. Preheat oven to 190C.
  3. Butter and line a 22 cm tart pan with shortcrust dough
  4. Bake the tart shell filled with weights for 25 minutes. After, take out the weights and bake for a further 8 minutes or until golden brown.
  5. Cool the tart shell and the can.
  6. Fill the tart shell with the caramel filling.
  7. Layer with the banana slices.
  8. In a medium bowl, whip the cream until soft peaks.
  9. In a separate, smaller bowl, mix the mascarpone cheese, instant coffee, sugar and extract until the cheese is soft and the coffee granules well dissolved.
  10. Add the cheese mixture to the cream and whisk until well combined.
  11. Spoon or pipe the cream onto the banana layer.
  12. Sprinkle with cocoa powder.

LinkWithin

Related Posts with Thumbnails