Tuesday, December 29, 2009

Madeleines


This is my second attempt at making madeleines. I don't understand why some people categorise them as cookies. I love them because they taste more like cake than their crunchy counterparts. It's light, fluffy and the lemon brings a refreshing flavour. They go fantastic with a cup of hot coffee.

Madeleines originate from France and were popularized by the author Proust in his book. They are called so after the name of the original cook. I didn't post the first batch of madeleines because I was still looking for a better recipe then. 


These were from my first try. The previous recipe was too sweet that I had to double the zest and add a whole lot of lemon juice into the batter. In retrospect, adding that lemon juice was not a good idea. Too much juice (acid) can react with the baking powder (base) and create more water. Better to substitute it with lemon extract.

This time around, the new recipe yielded better tasting madeleines. I substituted 1 tsp of the vanilla extract with lemon extract. My only fault was the oven. I followed the time guideline from the recipe but the madeleines turned out more brown than the picture in the book. It's strange because they tasted fine. It's just that their colouring is wrong...Don't be put off and do try the recipe. Maybe you won't have the same problem as I did. I'll have to figure out why and get a feel of the new oven here.  

Madeleines
adapted from here
(makes 14 large or 36 mini cookies) 

Ingredients
2/3 cup of plain flour
3/4 tsp baking powder
1/4 tsp of salt
1/2 cup caster sugar
Grated zest of 1 lemon
2 large eggs, room temperature
2 tsp vanilla extract
3/4 stick (105g) of butter, melted and cooled

pure icing sugar, for dusting 

Method 
  1. Whisk together the flour, baking powder and salt together in a medium bowl. 
  2. Working in a large bowl, rub the sugar and lemon zest together with your fingertips until the sugar is moist and fragrant. 
  3. Add the eggs to the bowl and with a hand mixer beat the mixture on medium speed, for 2-3 minutes, until pale, thick and light. 
  4. Beat in the vanilla extract. 
  5. With a rubber spatula, very gently fold in the dry ingredients, followed by the melted butter. 
  6. Press a piece of plastic wrap against the surface of the batter and refrigerate it for at least 3 hours or up to 2 days. This long chill will help the batter form the hump that is characteristic of madeleines (what I noticed was when I immediately baked the batter on my first try, the hump was less profound). 
  7. Center a rack in the oven and preheat to 200C. 
  8. Butter 12 full-size (or 36 mini) madeleine molds and dust the inside with flour. 
  9. Spoon the batter into the molds, filling each one almost to the top. 
  10. Bake the large madeleines for 11-13 minutes and minis for 8-10 minutes, or until they are golden (see pic below) and tops spring back when touched.

  11. Release the madeleines from the mold and transfer to a rack to cool to just warm or room temperature. 
  12. If you're making more batter, bake the next batch(es), making certain that you cool and then properly prepare the pan(s) before baking. 
  13. Just before serving, dust the madeleines with pure icing sugar.

Thursday, December 24, 2009

Packing and unpacking


I didn't think the day would come so soon. This year has gone by in a flash and 2010 is just several days away. Looking back at the year and the 3 years before, I have many things to be thankful for. A few of which are:

1. the friends that I met in Melbourne
2. the life experiences from living as an overseas student
3. the discovery and growth of my passion in baking

It was with a heavy heart that I have to pack my things and head back home to Jakarta for good. The decision was sudden and I thought that it wouldn't happen for at least another 2 years. But around a few months ago, the option came up and it left a strong impression on me. I felt that I just have to go back.

For what? I don't know yet. But what's for sure is that I'm starting something new with what I have been given. Just like unpacking my baking supplies in Jakarta today. The place may have changed, I can't bring all the cookbooks, ingredients or equipment with me. But I can take my experience, the more essential ingredients and accumulate the other things that I need to continue baking. In the end, the results will show.

As the year ends, take the positive and make the best out of it. Happy holidays everyone :) May this Christmas and New Year bring both joy and peace to you.

Saturday, December 19, 2009

Christmas baking


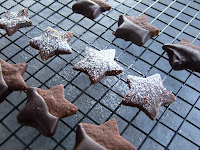
'Tis the season to be jolly. 'Tis the time of giving. These are a few ideas to put in your Christmas gift boxes.

Chocolate Hazelnut Cookies
adapted from Fine Cooking Winter 2005
makes 75 to 85 7cm to 7.5cm cookies

Ingredients
1 cup of whole hazelnut, toasted
1 1/2 tsp instant espresso powder
100g of semisweet chocolate, broken up or coarsely chopped
2/3 cup unsalted butter, slightly softened
1/3 cup unsweetened Dutch-processed cocoa powder
1 large egg
1 1/2 tsp vanilla extract
1/4 tsp salt
1 3/4 cup all purpose flour 

Method
  1. In a food processor, process the hazelnuts and espresso powder until they're ground to the consistency of a nut butter, 2 - 3 minutes 
  2. Melt the chocolate in a microwave or on the stove. Set aside to cool until warm. 
  3. In a large bowl, beat the butter, sugar, cocoa powder and hazelnut mixture with a hand-held mixer on medium speed until very well blended and fluffy (around 1 1/2 - 2 minutes) 
  4. Add the egg, vanilla and salt. Beat until completely blended and smooth, about 1 1/2 minutes.  
  5. On low speed, mix in half of the flour and then the melted chocolate just until evenly incorporated. 
  6. Mix or stir in by hand the remaining flour until evenly incorporated. 
  7. Set aside for 10 minutes until the dough firms up slightly. 
  8. Cut the dough into thirds.
  9.  Set each third between sheets of parchment and roll out each portion to 3mm thick. 
  10. Stack the rolled pieces on a tray and refrigerate until firm, about 45 minutes or several hours in the fridge (20 minutes in the freezer). 
  11. Position a rack in the center of the oven and preheat to 180C. 
  12. Butter baking tray. 
  13. Working with one dough at a time, cut out the cookies according to desired shape.
  14.  Transfer to the tray and bake for 7 to 10 minutes until they feel dry and almost firm when pressed in the center.
  15.  Let cook on the tray for 3-4 minutes before transferring them to racks to cool completely. 
  16. To serve, you can either dust with icing sugar or glaze with chocolate. To make chocolate glaze, freeze the cookies for 20 minutes beforehand. Then melt 8oz of bittersweet chocolate and 1/2 tbsp of flavourless oil. Working with just the number of cookies that can fit into your baking tray, dip each cookie and leave to cool in the fridge until set.

Almond Biscotti
adapted from Baking: from my home to yours

Ingredients
1 1/2 cups plain flour
1 1/2 tsp baking powder
1/4 tsp salt
1/2 cup yellow cornmeal
113g unsalted butter, at room temperature
1 cup sugar
2 large eggs
1 1/2 tsp pure almond extract
3/4 cup sliced almonds, blanched or unblanched

Method
  1. Center a rack in the middle of the oven and preheat the oven to 180C. Line a baking tray with baking paper. 
  2. Whisk the flour, baking powder and salt together. Add the cornmeal and whisk again to blend. 
  3. With a hand-held/stand up mixer, beat the butter and sugar together at medium speed for 3 minutes, until very smooth. 
  4. Add the eggs and continue to beat, scraping the bowl as needed, for another 2 minutes or until the mixture is light, smooth and creamy. 
  5. Beat in the almond extract 
  6. Reduce the speed to low and add the dry ingredients, mixing only until they are incorporated. 
  7. You'll have a soft stick-to-your fingers dough that will ball up around the beaters. Toss in the almond and mix just to blend. 
  8. Scrape half the dough onto one side of the baking sheet and work the dough into a log about 30cm x 4cm. 
  9. Bake for 15 minutes, or until the logs are lightly golden but still soft and springy to the touch. 
  10. Transfer baking tray to a rack and cool for 30 minutes. 
  11. Bring oven back to 180C. 
  12. Transfer logs to a cutting board and cut the logs into 2cm thick slices. 
  13. Return the slices to the baking tray and, this time standing them up, bake them in the oven for another 15 minutes or until they are golden and firm. 
  14. Transfer to racks and cool to room temperature.

Gingerbread Men
adapted from Donna Hay Magazine issue 48
 

Ingredients
1/2 cup (90g) brown sugar
2 1/2 cup (375h) plain flour, sifted
2 tsp ground ginger, sifted
1 tsp baking soda
125g butter, cold and chopped
2/3 cup (230g) golden syrup


Method 
  1. Place the sugar, flour, ginger and baking soda in a bowl and mix to combine. This is the gingerbread mix.
  2. Place the gingerbread mix, butter and golden syrup in the bowl of a food processor and process until a smooth dough forms.(Alternatively, beat the butter and syrup until combine and on low speed mix in the dry ingredients until a smooth dough forms) 
  3. Divide the dough into two pieces and between sheets of baking paper, roll to a thickness of 3mm. 
  4. Refrigerate for at least 30 minutes. 
  5. 15 minutes before baking, preheat oven to 180C and line a baking tray with parchment. 
  6. Using the gingerbread man cookie cutter, cut shapes from the dough and place on the baking tray. 
  7. Bake for 8-10 minutes or until golden. 
  8. Allow to cool on trays 
  9. I used edible white gel to draw buttons. Otherwise, combine and stir 80g of sifted icing sugar and 2 tsp of hot water until smooth to make your own icing. Place in a piping bag with a small nozzle to pipe the buttons.

Monday, December 14, 2009

The joy of holidays


Ah, the holidays! What I like most about them is the amount of spare time on hand. I can catch up with friends, go shopping, watch movies, finish up loose errands or make up for lost sleep without a tugging feeling at the back of my mind. Out of all these, I have been spending my week meeting up with friends to cook together. We cooked two nights in a row and each night we cooked a different cuisine.

Italian Night: Take Two
The first night we had Italian. 7 of us attempted homemade pasta again (this time tortellini style) and homemade pizza. Suffice it to say, the pizza dough was magnificent! The pasta turned out less than expected but still good. The dough was a bit dry in the beginning and we had to work extra hard in rolling it out. I have to thank V and H for that. Both of them devotedly rolled the pasta to a thickness of 1mm. We filled them with creamed mushroom and spinach ricotta.


My previous experience with dry yeast wasn't a good one so I was slightly unconvinced with making pizza dough at first. My suspicious were heightened especially after the yeast mixture did not show as many bubbles as the magazine's picture even though it had been left for 5 minutes as instructed. We decided to put it in a warmer spot in the kitchen and leave it for another 20 minutes. In the end, we discovered that you have to stir the mixture! The bubbles were hidden underneath the surface. If you don't stir it, it will always look smooth with bubbles only at the sides.

We made 4 toppings for the pizza and the dough goes well with both savoury and sweet ones. I really recommend this pizza base.

Basic Pizza Dough
adapted from Donna Hay Magazine Issue 47
makes 2x30 cm pizzas

Ingredients
1 tbsp active dry yeast
1 tsp caster sugar (white sugar works fine)
250ml lukewarm water
2 1/2 cups (375g) OO flour
1 tsp sea salt flakes
1 tbsp olive oil

Method 
1. Place yeast, sugar and water in a bowl and mix to combine.
2. Set aside in a warm place for 5 minutes or until bubbled appear on the surface.
3. Place the flour, salt and olive oil in a bowl and make a well in the centre.
4. Add the yeast mixture and mix together with well-floured hands to form a dough.
5. Knead the dough on a lightly floured surface for 3-4 minutes or until smooth and elastic.
6. Divide the dough into equal-siz balls.
7. Place on a lightly-floured tray under a clean damp cloth/cling-wrap and set aside in a warm place for 30 minutes or until the balls have doubled in size.
8. Press each dough ball into a round and roll out on a lightly floured surface to the desired size.
9. Add desired topping (see below)
10. Bake for 10-15 minutes in a 220C oven. 


Our toppings (Clockwise from left): 
1. tomato paste, mozzarella, parmesan, mushrooms, salami
2. nutella, toasted macadamia, marshmallows
3. tomato paste, mozzarella, parmesan, salami, pancetta
4. homemade aglio olio sauce, mozzarella, parmesan, mushrooms, parsley

Indo Night
The second night, we were joined by a few others and our pastor from church. We cooked nasi uduk (coconut rice), rendang (Indonesian beef stew), martabak telur (egg pancake) and martabak manis (sweet pancake). Our church has a tradition of pastors passing down the sweet martabak recipe, and our pastor joined us to share the secret and technique to cooking them.

Martabak Telur


Martabak telur in Indonesia is a crepe-like dish filled with curried minced meat, egg and spring onions. The crepe is usually made of spring-roll pastry and the whole dish is shallow- fried in a pan. Here's a snapshot of how we made martabak telur.


Martabak Manis


Now martabak manis is thicker and more like a pancake than a crepe. It's a very popular dessert back in Indonesia, with the town of Bandung noted for its origin. One secret to a good homemade martabak is the pan. It cannot be any random frying pan. The sweet martabak needs even heat to avoid burning so the pan must have a thicker rim (around 5 mm) to generate this heat. Another secret is that you have to be quick when pouring the batter onto the pan. And a final tip is to be generous with the toppings. This is not a dessert for the faint in appetite :D or if you're on a diet. Here are also snapshots of the cooking process.


Saturday, December 5, 2009

Back to basics


People often ask me when did I start baking and what did I first make. I'll share with you the story.

It began back in March 2007 and it was the strawberries 'n cream cupcakes from 500 Cupcakes. Two friends and I attempted to bake a couple of cupcakes for fun. We chose the strawberries 'n cream and the chocolate mud cupcake recipes from the book. A few weeks later, I attempted the first recipe on my own. 

I still remember..I wanted to give something personalised for easter. So gaining the confidence from the earlier group baking, I made 24 of the strawberries 'n cream cupcakes for the cell group and added 100g of dark chocolate chips to the batter. That experience gave me the first taste of the real joy of baking: making something artistic from scratch that can make people happy :) If you ask me, that's what I like best about baking.

Why the flashback? Well early in the week, a couple of my girl friends and I cooked together for dinner and we revisited this recipe for dessert. I have to say, the cupcakes taste just as good, if not even better. Not because of skills, but because of practice and experience. The many failure with cakes made me more attuned to what kind of texture I have to look for when mixing the ingredients. 

There are two things I have learned so far with regards to this recipe:
1. Always always have the butter and eggs in room temperature. You know when some recipes give you guidelines on how many minutes to beat? They're more likely to work if you have the two ingredients in room temp.

2. Be careful not to overbeat the batter. When the recipe says beat until smooth and pale, beat until the batter is very light yellow but still fluffy. Fluffy means that there is more volume than the start, it's lighter in texture as if there is air inside, but still soft when mixed. The batter is overbeaten if it becomes close to white and tough. Toughness is the best indicator of when you have gone too far. A tough batter will be very crisp outside but still wet and uncooked inside. A batter that is just right will make fluffy and soft cupcakes. If you prefer a denser one, stop earlier. 

These two parts are just the tricky bits of the recipe. Everything else is more straightforward than most. It's a simple one bowl recipe and easily changed to suit your liking. Add 4 tbsp of cocoa powder or cinnamon to taste with the other dry ingredients or fold in 100g nuts/100g dark or white chocolate chips/100g raisins after mixing and you'll have a whole other cupcake.

Vanilla Cupcakes
makes 18 cupcakes
adapted from 500 cupcakes 

Ingredients
225g unsalted butter
225g caster sugar
225g self-raising flour
4 eggs
1 tsp vanilla extract 

Method
1. Preheat oven to 175C (350F).
2. Place 18 paper baking cases in muffin tins.
3. Combine all the cupcake ingredients in a medium bowl.
4. Beat with an electric beater until smooth and pale, about 2-3 minutes.
(optional step: if you add nuts/chocolates/raisins, fold in the ingredient at this stage)
5. Spoon the batter into cases.
6. Bake for 20 minutes.
7. Remove tins from the oven and cool for 5 minutes.
8. Cool cupcakes on a rack.

Strawberries 'n Cream cupcakes
Extra Ingredients
350ml thickened cream
4 tbsp pure icing sugar, sieved
1 tsp vanilla extract
375g sliced small strawberries
4 tbsp strawberry jam
1 tbsp water

Method
1. Combine the cream, icing sugar and vanilla in the bowl and beat with an electric beater until soft peaks.
2. Spoon onto the cooled cupcakes and arrange the strawberries on top. 
3. In a small saucepan, heat the jam and water until melted.
4. Brush the mixture on top of the strawberries.
5. Chill until ready to serve.


Bonus recipe: honey chicken


I mostly post about desserts, but this honey chicken recipe is delicious, quick and simple that I just have to share.
 I was watching Better Homes and Garden on Foxtel's Lifestyle channel when they demonstrated how to make honey prawns. It inspired me to substitute it with chicken and for the amount of ingredients that go into the sauce, it's one good honey chicken.

One key to the dish is the batter. Rasa Malaysia has a great batter recipe and I substituted theirs for the TV show's. It's similar to a tempura batter with the addition of baking soda. With tempura batter always 1. use ice water, 2. leave chunks of flour inside. The chunks of flour make the batter crispier and the baking soda makes the flour rise. These 2 elements double the crisp. Serve the honey chicken immediately once you dip it in the sauce or it'll be soggy.

Honey Chicken
serves 5
Ingredients
500g chicken breast/thighs, diced
4 tbsp plain flour
4 tbsp corn starch
1/2 cup water
1/2 tsp baking soda
1 tbsp Chinese cooking wine (Shaoxing)
more cornstarch seasoned with salt and pepper
1/4 cup honey
Juice of 2 limes
sesame seeds (optional)

Method
1. Add the cooking wine to the chicken pieces and marinate for at least 10 minutes.
2. Combine the plain flour, cornstarch and baking soda in a medium bowl. 
3. Add water and gently mix the batter, but still leaving chunks of flour.
4. To cook chicken, coat it in the seasoned flour, dip in the batter and put into the hot oil.
5. Fry until golden in colour and drain on paper towel.
6. Heat the honey and juice of 2 limes in a saucepan over medium heat.
7. Dip each piece of chicken into the honey sauce and place on the serving plate.
8. Sprinkle with sesame seeds.


Tuesday, December 1, 2009

The king of fruits


In Asia, they say that the king of all fruits is the durian. I beg to differ.The title should go to the mango. Popularity-wise, mangoes win hands down. The people I've come across either love or hate the durian, and the split is 50-50. The majority of them though love mangoes. Taste-wise, the mango. What's there not to love? It's sweet, juicy, warm, soft, pleasantly fragrant (unlike the durian) and in a pretty deep yellow colour. It's the taste of summer in a fruit :) Desserts-wise...Mangoes. Mango pudding, mango sago, mango ice cream, mango gateaux, mango fruit..and lot of other dishes. They sound more appealing than the durian counterparts.

The moral of the story is that mangoes are a great ingredient to use in desserts. Especially now that summer is just around the corner in the land down under, mangoes have come into the supermarkets in abundance! 

The December edition of delicious. magazine featured a few mango recipes to welcome the summer season and the one I'm posting about is a great idea for birthday or party cakes. No oven baking is required. It's simple, fuss-free, quick and delicious! Remember the tiramisu cake I've posted before? The cake uses the same principles. Buy ready-made Savioardi (sponge fingers biscuits), dip them in the orange cordial and top with the mascarpone mixture and slices of mangoes. 

The decoration for the cake is the bit where you can experiment. Be creative! Pipe the leftover mascarpone, add white chocolate shavings, add mango gelatin for the top, whatever. For my cake, I added toasted almond flakes for the sides and arranged the mango slices to form a rose. One tip for the cake is to go easy on the orange-flavoured liquer..I thought that it was too much as sometimes when you eat the cake, you can feel the 'zing' of the alcohol. All in all, this is one awesome substitute for the popular and delicious mango gateaux.


Magomisu
adapted from delicious. magazine, Dec/Jan issue 2010

Ingredients
500g mascarpone cheese 
600ml thickened cream
50g pure icing sugar
2 egg yolks
1 tsp vanilla extract
125ml Contreau/Grand Marnier
Juice of 2 oranges
300g savoiardi (sponge finger biscuits)
3 mangoes, flesh sliced 1cm thick

Method
1. Line the base of a 22cm springform cake pan with baking paper.
2. Place the mascarpone, thickened cream, egg yolks and vanilla extract in the bowl of an electric mixer and beat on high speed until thick and well combined.
3. Combine the liquer and orange juice in a separate bowl.
4. Dip half of the sponge fingers into the orange mixture and layer in the base of the cake pan.
5. Spread one third of the mascarpone mixture and top with one-third of the mango slices.
6. Repeat the process, then top with the remaining mascarpone mixture.
7. Use the remaining mango slices to serve.
8. Cover the cake and chill for 2 hours or until firm.

Monday, November 30, 2009

A first at everything: homemade pasta


First word. First steps. First day of school. First time overseas. There's a start to every challenge in life and new paths bring both fear and excitement. I'm finally done with my bachelors degree and now I'm entering my first year with no predetermined path. For the past 16 years, the following year had been another 365 days of school. I usually remember my "first"s. And over the weekend, I made my first pasta.

Before this, I've never thought of trying pasta dough at home. Mainly because I have no idea how pasta is made. I had also imagined it to be one of those basic ingredients you just have to buy. A lot like rice or flour or any vegetables and raw meat. But then one book changed my perspective. I found it while browsing in Borders and its pasta recipe made me curious. Like all new recipes, I was excited to try it but nervous about the results.

At the end of the day, I found out that making pasta was less complicated than I thought. The pasta tasted softer than the packaged ones, but I thought it was not bad for a first try. It did not have the "eggy" or "floury" taste that I feared. Next time, I would probably cut it thinner and knead it a bit longer. Other than that, I had fun 'playing' with the dough and knowing that I made the entire dish :D I paired the pasta with mascarpone, smoked salmon, rocket and walnuts. I think it'd go well with a tomato base sauce too.

The book recommended the pasta to be made with OO flour instead of plain. This flour is the same kind used to make pizzas and is better because it's more fine, resulting in a softer and more malleable dough. OO flour is available in supermarkets. The ingredients for a basic pasta dough are real simple...1 egg for every 100g of flour. The recipe is for 200g, which serves 4. Variations of pasta dough include spinach, beetroot and squid ink.

Homemade Pasta (Basic Dough)
adapted from here 

Ingredients
2 large eggs
100g OO flour
a wooden work surface (preferably)

Method


1. Pour the flour on the work surface and make a well with 5cm walls.


2. Crack the two eggs inside, making sure not to spill and break the walls.


3. Using a knife, break the egg yolks and mix the eggs. After that, slowly incorporate the inner walls of the flour into the eggs until it forms a dough.
4. When the dough is almost done, use your fingers to mix the remaining flour in.


5. If it's still sticky, add a bit of flour. Stop once it's not sticky anymore.


6. Knead the dough for 5-10 minutes.


7. The dough is ready if you see bubbles inside when you cut it.


8. Wrap in clingwrap and leave for 20 minutes.


9. Lightly dust the work surface and roll the dough to about 1mm thick. It should be thin enough that when you put it over your hand you can see the outlines of your hand.


10. Fold the two sides until it reaches in the middle.
11. Cut vertically around your desired width.


12. The fresh pasta is done and ready to use.
13. To cook, boil pasta for a few minutes until al dente. The cooking time depends on the width but it's usually done when it floats to the surface.

Monday, November 23, 2009

A sweet finish


There is no satisfying way to end a meal than with a lovely dessert. It can turn around the whole dining experience or add that extra wow factor. This classic berry tart is one example. It's simple to make yet very elegant.

Last Wednesday was my first time having friends over and cooking dinner from start to finish. On the menu were pesto spaghetti, paprika chicken, garlic bread (with the help of a friend) and this triple-berry tart. I have to say, I do quite like entertaining after this experience :D I especially had fun making the tart and the pesto sauce from scratch.

The tart uses the sweet version of the shortcrust pastry I was talking about in my previous post. The recipe is a bit different from others I've come across as it doesn't use the egg white or ice water to mix the dough. I'm not 100% sure of what's the effect, but taking a wild guess, having no egg white or water probably makes the tart crispier and harder after it comes out of the oven. For a softer and more crumbly crust texture, bake it a day ahead and place it in the fridge overnight.


What I like about Dorie's berry tart recipe is that you can tweak and add your personal touch. For the crust, you can substitute 1/4 cup of the flour with your choice of ground nuts or put in spices to add more flavour. For the pastry cream, you can add 1-2 tbsp of liqueur or 2-3 tsp of cinnamon powder or ground ginger after beating in the vanilla extract. You can even get rid of the berries and use other fruits like peach or kiwi instead. Mix and match the flavour combination to get what you like or fit whatever is in season. Have fun baking~

Quick Classic Berry Tart
adapted from here
makes a 23cm tart

I. For the sweet tart dough
Ingredients

1 1/2 cups plain flour (I substituted 1/4 cup with almond meal)
1/2 cup caster sugar
1/4 tsp salt
135g very cold unsalted butter, cut into cubes
1 large egg yolk

Method
1. Whisk the flour, ground nuts, sugar and salt together in a large bowl.
2. Put in the butter.
3. Working quickly, with a pastry cutter/dough scraper, cut the pieces of the butter and push it into the flour until the mixture resembles breadcrumbs (it's the same method as the savoury crust. you can also use your hands and rub the butter into the flour.)
4. Mix in the egg yolk thoroughly and until the dough just comes together to form a ball.
5. Press the dough over the bottom and up the sides of a buttered 23cm tart pan with a removable bottom. Press the crust in so that the edges of the pieces cling to one another, but not so hard that the crust loses its crumbly texture.
6. Freeze the crust for at least 30 minutes or until you want to bake it.
7. To bake the crust, preheat the oven to 190C.
8. Butter the shiny side of a piece of aluminium and fit the buttered side down, tightly against the crust.
9. Bake the crust for 25 minutes.
10. To fully bake, remove the aluminium foil and bake for another 8 minutes or until firm and golden brown. Keep an eye out as it can be done quicker.
11. Transfer tart pan to a rack and cool the crust to room temperature before filing.

II. For the pastry cream 
Ingredients
2 cups whole milk
6 large egg yolks
1/2 cup sugar
1/3 cup cornstarch, sifted
1 1/2 tsp vanilla extract
50g unsalted butter, cut into bits at room temperature 

Method
1. Bring the milk to a boil in a small saucepan.
2. In a medium saucepan, whisk the yolks together with the sugar and cornstarch until thick and well-blended.
3. Still whisking, drizzle in about 1/4 cup of the whole milk
4. Whisking all the while, slowly pour in the remainder of the milk.
5. Put the pan over medium heat and whisk vigorously, constantly and thoroughly.
6. Bring the mixture to a boil.
7. Keep at a boil, still whisking, for 1 to 2 minutes, then remove the pan from the heat.
8. Whisk in the vanilla extract.
9. Let sit for 5 minutes then whisk in bits of butter, stirring until they are fully incorporated and the pastry cream is smooth and silky.
10. Scrape the cream into a bowl, press a piece of plastic wrap against the surface of the cream and refrigerate until cold.

III. Bringing it all together 
Extra ingredients
chosen berries (raspberries, blueberries, strawberries, blackberries or a combination)
raspberry/strawberry jam 

Method 
1. Spoon the pastry cream into the tart crust to come almost to the rim.
2. Even the surface with a rubber spatula.
3. Carefully lay your chosen berries in any pattern that pleases you.
4. Place the jam in a saucepan, add a little bit of water and bring to a boil.
5. Cool jam mixture for a while.
6. Using a pastry brush, dab the berries with the jam.
7. Refrigerate for a few hours or overnight.
8. Cut and serve :)


LinkWithin

Related Posts with Thumbnails