Friday, October 30, 2009

Cookies for tea


If you've been following my blog (which I want to thank you for :D), you might have wondered why I haven't posted a recipe on cookies. To tell you the truth, I don't really like them as much as cakes or other desserts which you can easily bite into. They're also sometimes too sweet for my taste. On top of that, most of my previous attempts at making cookies have failed.

This one though, was an exception. I recently took a liking to jam sables after having the first bite in Melbourne's Brunetti cafe. They make theirs with blackberry or apricot jam and both go really well with coffee. So I was flipping through Dorie's book when I saw this sable recipe that just screams out to be tried.

This recipe calls for quite a lot of cinnamon powder. If you don't like cinnamon, I'd suggest you cut down or omit it altogether. You can substitute it with a tsp of vanilla extract and/or 1/2 tsp of almond extract instead. Always get good quality jam. It is the ingredient which holds the cookie together. And not just literally :)

Linzer Sables
adapted from here
makes 50 cookies or 25 sandwiched ones

Ingredients
1 1/2 cups almond meal
1 1/2 cups all-purpose flour
1 1/2 tsp cinnamon
1/4 tsp salt
1 large egg
2 tsp water
113g butter, softened, at room temperature
1/2 cup sugar
1/2 cup raspberry jam plus 1 tsp water
pure icing sugar (for dusting) 

Method
1. Whisk together the almond meal, flour, cinnamon and salt.
2. Using a fork, stir in the egg and water together in a small bowl.
3, Using an electric mixer, beat the butter and sugar at medium speed until smooth, about 3 minutes.
4. Add the egg mixture and beat for 1 minute
5. Reduce the speed to low and add the dry ingredients, mixing only until they disappear into the dough. Don't work the dough much once the flour is incorporated.
6. If the dough comes together, but some dry crumbs remain, use a spatula to finish blending.
7. Divide the dough in half.
8. Work with one half at a time. Put the dough between 2 large sheets of wax paper or plastic wrap.Using your hands, flatten the dough into a disk.
9. Use a rolling pin and roll out the dough until around 0.5mm thick.
10. Repeat with the other dough.
11. Chill both doughs for 2 hours in the fridge or 45 minutes in the freezer.
12. After taking them out, thaw until the dough is just soft enough to cut out. Use your desired cookie cutter and cut as many cookies as you can from the dough.


13. You can roll the leftovers again and cut more cookies from it.
14. Line a baking tray and bake the cookies in a 190C oven for 9-13 minutes until they are lightly golden, dry and just firm to the touch. Keep an eye towards the end.
15. Transfer cookies to a rack and cool to room temperature
16. To make the sandwich cookies, heat the jam and water in a saucepan and bring to a boil.
17. Turn off heat and let the jam cool slightly.
18. Spoon 1/2 tsp in the center of the full cookie and sandwich with the cut out half.
19. Just before serving, dust with icing sugar.

Sunday, October 25, 2009

Chocolate & coffee with a twist


A cup of mocha's an essential start for me, 3 days a week. I love mixing chocolate with coffee...it's a perfect balance of sweet and bitterness that leaves me satisfied. A lot like life. But sometimes life also gives you surprises, so here's a chocolate and coffee cake with a twist: dates.


I found a new muse these past few weeks and stumbled upon the recipe there. Even though the picture of the cake looked delicious, I was reluctant to try the recipe at first. I know coffee and dates go well individually with chocolate, but I wasn't sure about mixing all three together. Furthermore, not everyone likes dates. Sometimes, you have to think of your recipient when you're baking :D Setting aside those concerns, I decided to give it a try.

The first bite was unique..I didn't know what to expect so it took a while to place the flavour and match it to a memory. A few bites later, the cake tasted more and more like chocolate. If you're familiar with the taste of dates, you can taste it very subtly in the background. Otherwise, you'll only recognize the chocolate. Even so, the dates gave the cake a very nice thick texture without being overly sweet.


My tip for this cake is to use GOOD QUALITY CHOCOLATE. Good quality cocoa powder and most importantly good quality CHOCOLATE CHIPS. Specially for this recipe, I substituted my regular home brand chocolate chips with Cadbury. The chocolate chips made the cake more special. When my friend advised me to use only the best quality when it comes to chocolate, she wasn't kidding. This small thing made a big difference. 

So for all you adventurous bakers out there, here's the recipe ;)


Chocolate, Coffee & Date Cake
makes one 20 cm (8-inch) cake

Ingredients
250g pitted dates, halved
1 1/4 cups hot strongly brewed coffee (5 tsp instant coffee powder dissolved in 1 1/4 cups of boiling water)
155g unsalted butter, room temperature
1/2 cup caster sugar
1/4 cup light brown sugar
2 large eggs, room temperature
1 tsp vanilla extract
1 cup plain flour 
1/2 cup unsweetened cocoa powder
1/2 tsp salt
1/2 cup chocolate chips (more if you like it chocolatey)

Method
1. Heat oven to 180C and butter a 20-cm cake pan.
2. Place pitted dates in a bowl and pour over the hot coffee. Let it sit for at least 5 minutes as you prepare the other ingredients.
3. In a large bowl, using an electric mixer, beat together the butter, caster sugar and brown sugar on medium speed until fluffy, about 2 minutes.
4. Beat the eggs, one at a time and then the vanilla extract.
5. Scrape down the sides and bottom of the bowl with a spatula and beat again until the mixture is uniform.
6. Place a sieve over the bowl with the butter mixture and put the flour, cocoa powder, baking soda and salt in the sieve.
7. Sift the dry ingredients.
8. With a spatula, mix the dry ingredients gently into the butter mixture until nearly combined (the batter is still very dry at this stage, it's okay). 
9. Pour the dates and coffee into a blender/food processor and puree the mixture completely.
10. Add the pureed dates to the batter, and mix with a spatula until all the ingredients are combined.
11. Pour the batter into the prepared pan and evenly sprinkle the top with chocolate chips.
12. Bake for 55-60 minutes. 
13. Cool the cake to room temperature and then turn onto a rack to cool further.
14. The cake is best served at room temperature and it keeps up to 4 days if wrapped air tight in room temperature. Dust with icing sugar before serving.

Saturday, October 24, 2009

Cooking adventures

This post is not about my baking. Don't worry, it is about food. But food made by my beloved sister, R :)

Lately, she's been very adventurous in the kitchen and boy does she cook! She made these three dishes and they are delicious! Quick, fuss-free and great for the exam period.

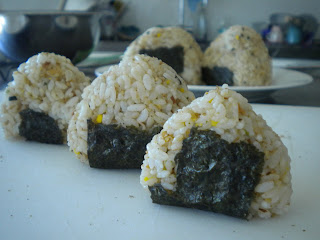
So first up, she made tuna onigiri.

Aren't they cute? The secret to a great onigiri is to use sushi rice. We also added Japanese rice seasoning for extra flavour. We discovered that you have to wet your hands completely before molding them into triangles. Otherwise, the rice will stick to your hands. And when they stick, they will stick real bad.

Up next, is Japanese okonomiyaki.


Bacon, cabbage and a generous helping of tonkatsu sauce and japanese mayonnaise. Always use Japanese mayonnaise. It will give the okonomiyaki a sweeter but also savoury flavour. You taste less oil and egg yolk.

Then her most recent creation is whole-milk pancakes.


So yes, whole milk can also make pancakes fluffy. The key to a fluffy pancake is to leave the batter cooking until holes appear on the surface and then flip it. Refrain from patting on the pancake and LEAVE it ALONE until both sides are brown. Patting them may burst the air bubbles that are essential to their fluffiness. Getting an even colour is more tricky. What R found was that the pan must not be too hot. You will know that it is when you add butter and it starts to spit.

It was just recently that R started to cook. It goes to show that it's never too late to start and that practice does make perfect. Or close to it :)

Onigiri on Foodista

Sunday, October 18, 2009

Of recipes and salvaging...


Ask any baker, and they will tell you that part of baking is dealing with things that don't go according to the written recipes. When your baked goodies don't turn out as expected, it's time to find ways to salvage it (if any) and figure what went wrong...

To commemorate the arrival of spring and my last free week before my final exam revision (yes, I'm graduating soon!), I decided to make blueberry cupcakes with cream cheese buttercream. Sad to say, things didn't go as planned and a few mishaps occurred, with one especially because of my own carelessness.

The most critical fault was that the cupcakes were still underbaked. It was also mortifying to find it out only after I finished piping buttercream on them! I altered a recipe I found, but stuck to the prescribed baking time. 


Moral of the story, it pays to be attentive to the baking time when changing a recipe and to be more flexible when following a recipe. Don't merely stick to a number but check for the cupcake's 'doneness' inside, even if the tops look good. (I don't think this applies to sponge cakes though, 'cause you shouldn't poke anything inside; but that's another story...). Yes, it's an extra effort but it will make all the difference.

The taste of the cupcakes was good, and it was such a shame to throw them away...I could salvage it if I want to...but then maybe another day...Anyway, the original recipe is here, but I adapted it below. Luckily, it's not all doom and gloom. Two gems came out of this baking episode. One is the yummy cream cheese buttercream :) I found that you don't have to go through making glucose and using the thermometer to make the buttercream. Dorie Greenspan's method works out fine. And two...scroll down to see ;)

Blueberry Buttermilk Cupcakes
makes 12 

Ingredients
1 1/3 cups of all purpose flour
1/2 tsp baking powder
1/2 tsp baking soda
1/4 tsp salt
5/6 cup (208g) sugar
1/4 cup (62.5g) butter, room temperature
2 egg whites
1 tsp vanilla extract
1 cup buttermilk
100g blueberries 

Method 
1. Preheat oven to 180C, line a 12-muffin tin.
2. Sift together flour, baking powder, baking soda and salt.
3. Cream together the butter and sugar, around 3-5 minutes (depending on your butter's softness).
4. Beat in the egg whites and vanilla thoroughly.
5. Add the flour to the egg mixture, alternating with buttermilk, in two or three additions.
6. Fold in the blueberries.
7. Spoon into the 12 muffin cases.
8. Bake until a tester comes out clean, 20-22 minutes (but bake longer if they're not done).
Cool on a wire rack before frosting. 

Cream Cheese Buttercream
adapted from here

Ingredients
170g butter, room temperature
125g cream cheese, room temperature (more, if you like it 'cheesier')
3 egg whites
1/2 cup sugar
1 tsp vanilla extract 


Method 
1. Put the sugar and the egg whites in a heat-proof bowl and whisk over simmering water, for around 3 minutes, until the mixture is shiny like marshmallow cream.
2. Take it off the water and using a hand-held (stand-up) mixer on medium speed, beat until room temperature, around 5 minutes. 
3. Still on medium speed, add the butter, in 3-4 additions.
4. Add the cream cheese, also in 3-4 additions.
5. Beat the mixture for 6-10 minutes until smooth.
6. Beat in the vanilla extract.

Okay, so the second good thing that came out of this is my cupcake decoration. I tried piping with a ziplock bag and guess what...


A rose! Snip off a bit of the bag's edge and when you squeeze it out, try to get the buttercream out flat. I discovered this by accident. Although it's not the best, I'm quite happy with it. I will still have to practice and perfect it next time :)

Monday, October 12, 2009

Dorie Greenspan's perfect party cake...


I came across Dorie Greenspan and her book, Baking: from my home to yours a few weeks into surfing the baking blogsphere. I have never heard of her before, but after reading about how talented and gifted she is in turning complicated recipes into simpler ones, I can't help wanting to get hold of her book. She's a professional and home baker who trained in Parisian sweets and under masters such as Julia Child and Pierre Herme. My excitement bubbled after my friend helped me buy the book overseas.

The recipe that jumped out to me was her 'perfect party cake'. Looks, taste, budget and method-wise, this cake is truly perfect for birthday celebrations! The steps are not overly complicated and they're just enough to be a challenge for a novice baker like me :D This blog is still lacking in layered cakes and what better way to start than from the very basic.

The 4-tiered-cake is a lemon buttermilk cake filled with a more subtle lemon buttercream and raspberry preserves. Since lemon is very versatile with all fruits, the raspberry can be substituted with strawberry, blueberry, blackberry or whatever berry you have on hand!

After tasting the buttercream, I decided to double the lemon juice and add sugar+toast the coconut flakes. Surprisingly, the combination of these flavours worked and the cake was delicious! The cake flour made the buttermilk cake soft and there was no overly sweet after taste. Nothing disastrous also happened thanks to Dorie's clear and easy to understand instructions.

Given it's my first attempt to make a multi-layered cake, I'm quite satisfied with how it turned out. This recipe is definitely a keeper and I can't wait to try out her other ones!

Dorie Greenspan's Perfect Party Cake

adapted from Baking: from my home to yours.

For the Cake 
2 1/4 cups cake flour (click to see how to make it)
1 tbsp baking powder
1/2 tsp salt
1 1/4 cups buttermilk
4 large egg whites
1 1/2 cups sugar
3 tsp grated lemon zest
1 stick/8 tbsp unsalted butter, at room temperature 
(very important, see step 4)

Method
1. Sift together the flour, baking powder and salt.
2. Whisk together the milk and egg whites in a medium bowl.
3. Put the sugar and lemon zest in another large bowl and rub them together with your fingers until the sugar is moist and fragrant.
4. Add the butter and beat at medium speed for a full 3 minutes, or until the butter and sugar are very light 
(if the butter isn't at room temperature, you may need to beat longer like I did. I had to beat for a full 15 mins, don't stick to the time if it hasn't been creamed properly, use your experience/feeling. You know it's ready from the pale colour and when you can still feel the sugar in the butter if you rub the mixture between your fingers. If it feels just like butter, it's over-beaten. This is to aerate the cake so that it will rise and not be rock-hard!).
5. Add in 1/3 of the flour mixture, still beating on medium speed.
6. Beat in half of the milk-egg mixture, then half of the remaining dry ingredients until incorporated.
7. Add the rest of the milk-egg mixture beating until the batter is homogeneous, then add the last of the dry ingredients.
8. Finally, beat for a good 2 minutes to ensure it's thoroughly mixed and well aerated. 
9. Divide between 2 buttered 20cm spring-form pans and bake for 30-35 minutes in a 180C oven (160 fan-forced). 
10 Once baked, cool in the pan for 5 minutes, then invert and cool to room temperature.


For the Buttercream
1 cup of sugar
4 large egg whites
3 sticks (12 oz) unsalted butter, at room temperature
1/4 cup fresh lemon juice
1 tsp pure vanilla extract

Method
1. Put sugar and egg whites in a large heatproof bowl, and fitting the bowl over a pan of simmering water, whisk constantly for about 3 minutes, until the bowl feels hot to the touch. The sugar should be dissolved and the mixture will look like shiny marshmallow cream. Remove bowl from heat.
2. Beat on medium speed until the mixture is cool, about 5 minutes.
3. Add the butter on stick a time, beating until smooth. 
4. Once butter is in, beat on medium-high speed until it is thick and very smooth, about 6-10 minutes. It's okay if it curdles or separates during this time, just keep beating and it will come together again.
5. Gradually beat in the lemon juice on medium speed until it is all absorbed, then beat in the vanilla.
6. You should have a shiny, smooth, velvety, pristine white buttercream.

For the finishing
2/3 cup blackberry jam
1 1/2 cups shredded coconut, sweetened and toasted

Assembly
1. Cut each of the cake layer into half.
2. Spread the blackberry jam and topped it with the buttercream 
3. Put another layer and repeat the sequence. 
Layering cakes turned out to be quite difficult if you're after a perfectly tiered one! If the cake is uneven, cutting off the lopsided part helped a lot.
4. Use the leftover buttercream to frost the whole cake and then pressed the coconut into the frosting.

Saturday, October 10, 2009

Isn't flour called by any other name just as good?


I still remember when I first started baking, I was confused when one recipe called for plain flour and another called for self-raising. Can I just use one for the other? Does that mean I have to buy both? What if I will only use self-raising flour after that? Due to my inexperience, I had to throw out a carton of plain flour...Yep, it was that bad that I didn't use it till its expiry

Two years later, a recipe called for cake flour. This was another puzzle. Even worse, I couldn't find this flour in my supermarket aisle.

The more I bake, the more flour types I stumble across in recipes. In addition to plain, self-raising and cake, there's biscuit flour, bread flour, glutinous rice flour, pizza (OO) and a few other more specialized flours (and for which I've forgotten their name :D). What in the world are they???

Basically these flours are separated by their protein content. Bread flour has the most because it's needed to make the bread soft as we know it to be and biscuit flour has the least to make them crunchy and hard. The all purpose flour is in between while the cake flour has more moisture from cornstarch to give cakes a softer texture. That's why it's better for sponge cakes or swiss rolls. Self-raising flour is just plain flour with baking powder and salt already added. OO flour is a finer version of plain flour to make the pizza dough malleable and glutinous rice flour makes the dessert more chewy and elastic (hence the mochi!). The list would just go on, but the fun part of baking is learning them as you go on your journey :)

The good news is, if you need cake flour, there is a way to make it in your home! And guaranteed, the rest won't go to waste ;) ('coz there isn't any leftover at all!). Thanks to Joy the Baker for this amazing tip~

How to Make Cake Flour
1. You will need plain flour and cornstarch.


2. Measure out the plain flour as much as your recipe needs.
3. For every 1 cup of the plain flour, take out 2 tbsp and return it into the packet.


4. Replace the flour you've removed with 2 tbsp of the cornstarch.
5. Sieve the mixture 5 times


6. Voila~ here is your cake flour :) Just as much as your current recipe.


If you're wondering why I'm making cake flour at this time, check back soon :) Here's a hint...


Tuesday, October 6, 2009

Making friends with buttercream


I admit it. I used to dislike buttercream. I didn't want to come near a recipe of it at all. The thought of it being all butter and sugar put me off...Well, that was the case until last Saturday. A few of my friends and I attempted to make a gateaux. Coffee buttercream was its filling.

Since then, I'm warming up to it. A little. I don't love it but I think buttercream is good. It's so versatile! The American version is easier to make and it's good as a filling or frosting on cakes, cupcakes, you name it. You can also add any flavour that you want into the basic recipe. So if you are someone like me, slightly health-conscious, or weight-conscious...make friends with buttercream. It's okay, once in a while :) 

Buttercream 
(recipe courtesy of my friend, Erisca) 

Ingredients
100g butter
25g pure icing sugar 

Method
1. Using a hand-held mixer on medium speed, beat the butter until it's soft.
2. Add the sugar

3. On the same speed, beat the two until combined

4. Continue beating, occasionally scrapping the sides of the bowl so that the mixture is evenly mixed

5. Beat until the mixture is fluffy, pale and not glossy
[the mixture should turn from yellow to pale yellow to almost white]


Flavoured Buttercream 
6. If you want to add vanilla extract, chocolate sauce, coffee or in my case maple syrup, add the flavour after the buttercream is done and mix on low speed thoroughly. Add to taste :D
7. FROST!
Okay, so I used a piping gun to try out this maple syrup buttercream on the six mini banana muffins I made the other day. Frosting is hard! It's not as simple as the end product make it look or how the chefs do it. I need practice! Anyways, it's frosted and then sprinkled with chocolate flakes. Banana, maple, chocolate~


Monday, October 5, 2009

Banana banana...


Sweet. Creamy. Healthy.

It's no wonder that this fruit's charm is hard to resist! Bananas are healthier alternatives to sweet/snacks cravings, quick breakfasts and a source of energy and vitamins, all of which the body dearly needs. It's also used across cultures, with my earliest memory of a dessert when dining with my family in a Chinese restaurant, a banana fritter.

One interesting fact I came across about bananas this week was that this fruit is Woolworth, Melbourne's best selling product! Surprised? I was. A friend of mine visited the retailer's distribution center out of town. She told me that they had many rooms with different temperatures and air circulations specially to ripen the bananas before they're sent to the shops. Tell me about it. To make a sweet and flavourful banana cake, overripe bananas are essential!

Lacking the technology, it took me one week to make these bananas overripe...


Even so, it was worth the wait. This cake came out banana-ish and moist, a recipe for keeps :) It might also be richer if you substitute half the caster sugar with brown sugar.

Banana Cake
adapted from here


125g (4oz) butter
175g (6oz) caster sugar
2 eggs
2 large mashed ripe bananas (I used 3)
1 tsp Baking soda
2 Tbsp boiling milk
1 tsp baking power
225g (8oz) flour
 

Method
1. Cream butter & sugar till light and fluffy.
2. Add eggs one at a time.
3. Mix in mashed bananas.
4. Add baking soda that has been dissolved in hot milk.
5. Lastly mix in sifted flour & baking powder. 
6. Pour into a 20cm ring pan and bake on 180C for 40mins
(I used a loaf pan instead and 6 mini muffin spaces; It can also be used to make 18 standard size muffins, which you will have to bake on 180C for 15-20mins.) 


LinkWithin

Related Posts with Thumbnails